So you want to make a pallet board wall, here are 9 simple steps to help get you started!
Materials Needed:
- Reclaimed pallet wood boards
- Circular saw or hand saw
- Measuring tape
- Level
- Brad nailer or hammer and nails
- Sandpaper
- Wood glue (optional)
- Black paint (optional)
- Paintbrush or roller (optional)

Step 1: Measure the wall and the pallet boards
Before you start, measure the wall where you want to install the pallet boards. Then measure the length and width of each pallet board to determine how many you'll need to cover the wall. If you are using our material, see the chart in the product description to find how many boards you will need to cover your area. Find it here
Step 2: Paint the wall black (optional)
For added depth and dimension, you can paint the wall black before installing the pallet boards. This will create a contrast between the black wall and the natural wood color of the pallet boards.
Step 3: Prepare the pallet boards
If your pallet boards are rough or have any protruding nails, use sandpaper to smooth out any rough edges or surfaces.
Step 4: Cut the pallet boards to size
Using a circular saw or hand saw, cut the pallet boards to the desired length. Be sure to measure carefully and make straight cuts.
Step 5: Lay out the pallet boards
Lay out the pallet boards on the floor in the order you want to install them on the wall. This will help you get an idea of how the finished product will look and make installation easier.
Step 6: Install the first board
Starting at the bottom of the wall, use a brad nailer or hammer and nails to attach the first pallet board to the wall. Use a level to ensure that the board is straight and flush with the wall.
Step 7: Install the rest of the boards
Working your way up the wall, attach each pallet board to the wall with a brad nailer or hammer and nails. Be sure to use a level to ensure that each board is straight and flush with the wall.
Step 8: Cut the final board
Once you reach the top of the wall, measure the space between the last board and the ceiling and cut the final board to size. You may need to cut the board longways to fill the remaining space.
Step 9: Sand and finish the pallet wall
Once all the boards are installed, use sandpaper to smooth out any rough edges or surfaces. You can also finish the pallet wall with stain, paint, or a clear coat of polyurethane to protect the wood and give it a finished look.
Optional Step: Use wood glue
If you want extra stability and strength, you can apply a small amount of wood glue to the back of each pallet board before nailing it to the wall. This will help the boards adhere to the wall and prevent any movement or warping over time.
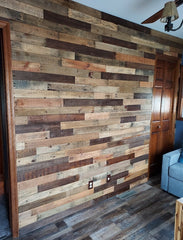
Installing a pallet wall is a great way to add rustic charm and character to any room in your home. With these simple steps you can create a beautiful and unique feature wall that's sure to impress!
If you would like to purchase pallet boards CLICK HERE